Joined: 04 Aug 2018 Posts: 1447 Location: Appalachian mountains, USA
Posted: Thu Jul 25, 2019 14:46 Post subject:
And you do NOT need SMB 1.0 unless your drive is so old that it supports nothing newer. I had to add SMB 1.0 support in Windows temporarily once to retrieve data from an old drive, but that's the only time I've needed it. I don't believe Windows 10 will let you keep SMB 1.0 support permanently. When you add that support, Windows will remove it after some modest number of days pass without it actually being used. But again, unless your drive is many, many years old, you should not need it. dd-wrt will work with SMB versions 1.0 or 2.0. (It does not do 3.0.)
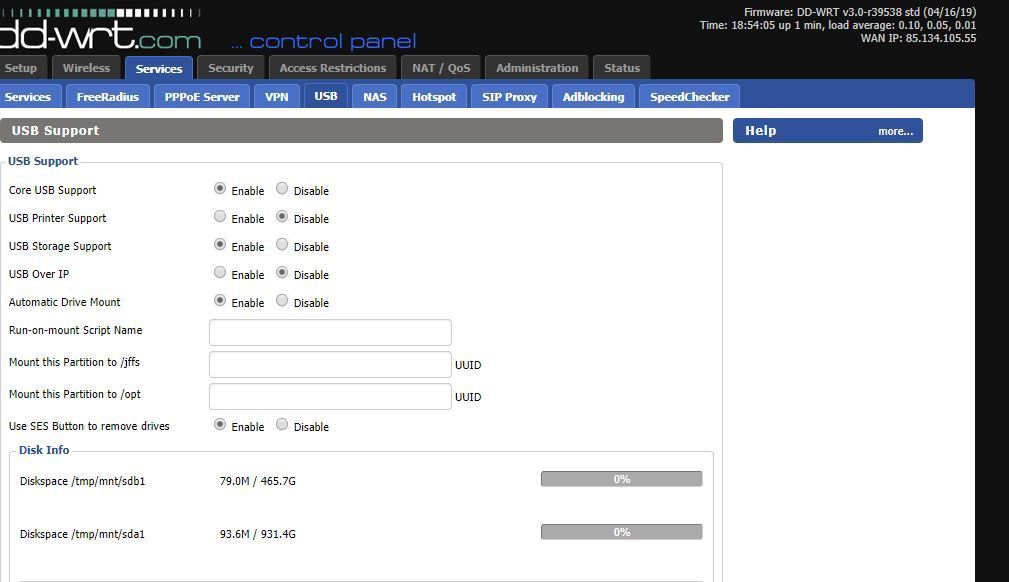
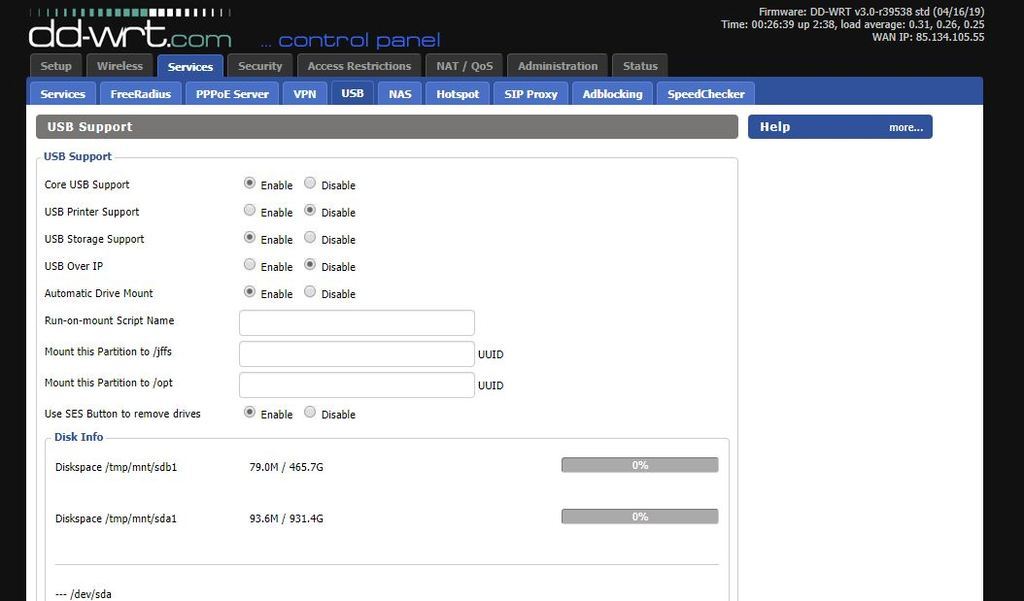
Let me check my settings to see what I have working for USB-drive sharing. (I'm not going back and going through the setup steps, so a certain amount here is from memory.) Note that the Apply steps are not optional. You can't fill in everything and use Apply just once. On the USB page, I have
Core USB Support: Enabled
USB Printer Support: Disabled
USB Storage Support: Enabled
USB Over IP: Disabled
Automatic Drive Mount: Enabled
Use SES Button to remove drives: Enabled
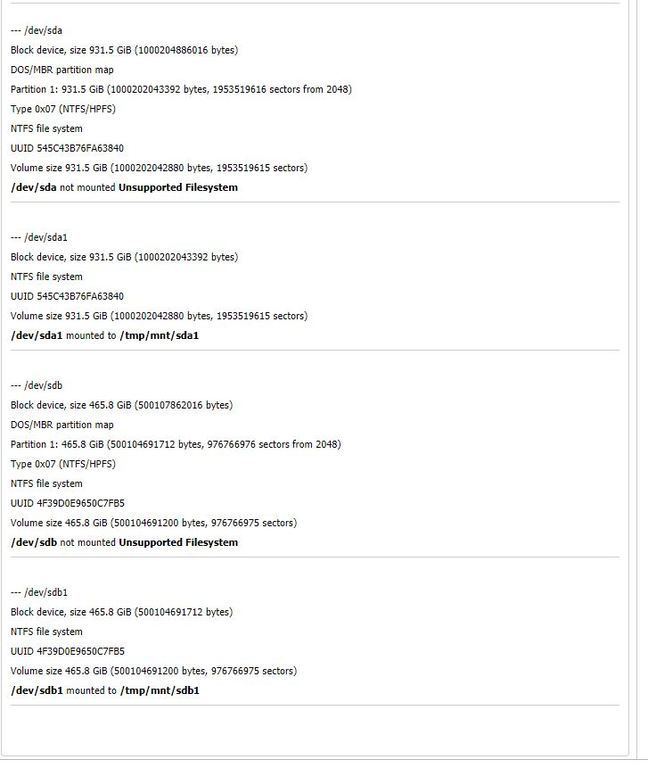
Set those things first, plug in your drive - on my WRT1900ACSv2 I use the one USB 3.0 port, labeled USB 2 - and only then do Save and Apply. After the Apply, wait for many seconds, maybe a minute even, until /dev/sda1 mounted to /tmp/mnt/sda1 appears at the bottom of the screen. You may have to navigate away from the page and back. (Ignore the earlier line /dev/sda not mounted Unsupported Filesystem.) Until you get that mount confirmation, there is no reason to proceed. You can also enter the CLI and type df to get a list of mounted drives and the space used/available on each. If the mount succeeds, you should see a line for /dev/sda1 at the end. "Automatic Drive Mount" checked above will cause this mount process to happen whenever the router boots up.
Note that once the drive is mounted, ideally you should unmount the drive before unplugging the drive or powering down the router. You can do this with umount /dev/sda1 in the CLI (confirm with df) or by holding down the SES button on the router (on a WRT1900ACSv2 it's blue and in the back on the opposite side from the power switch) until the router's power light blinks off and then on. Some say that after this you should wait another 30 sec before powering down. I suppose that's to keep power to the drive long enough for it to finish writing things from buffers to the drive proper. If the drive has activity lights, watch them.
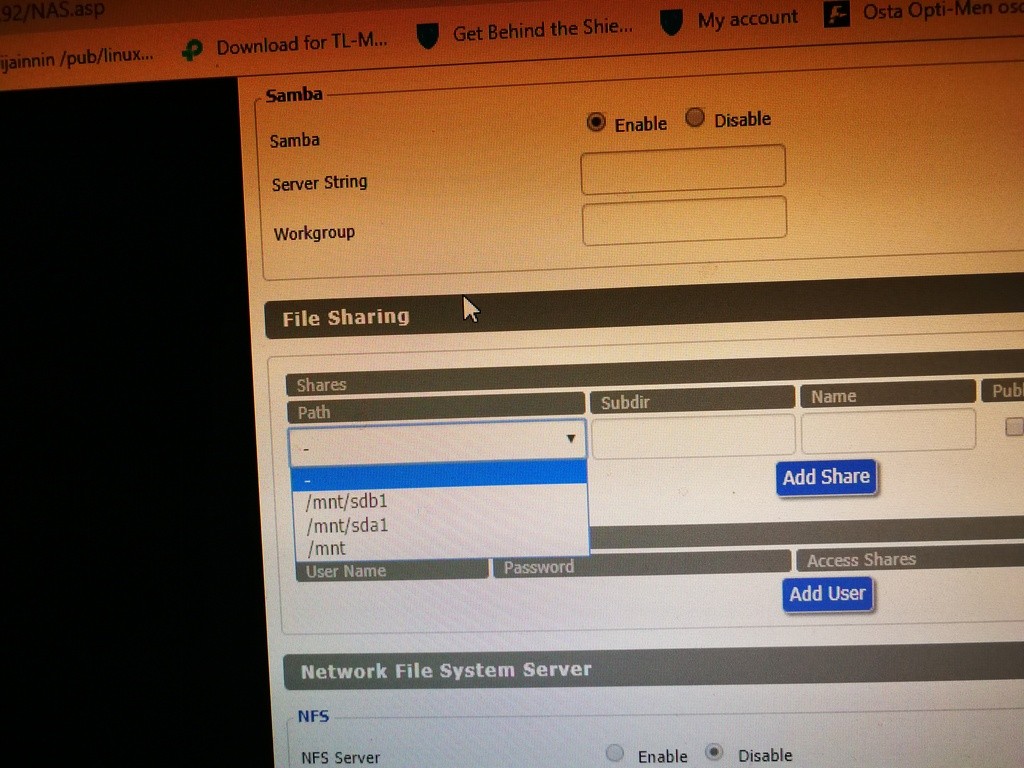
Once the drive is mounted, go to the NAS page. There the Drive Manager should show lines for /dev/sda and /dev/sda1. The latter is the important one. It should show NTFS if the drive is formatted that way. Choose it in the menu if necessary. (Obviously stay clear of the format button unless you want to effectively erase the drive contents.) Below that, enable the Samba Server and hit Apply. Then under File Sharing you need a line for /mnt/sda1. Use Add Share and the menu drop down. Note that /mnt is a symbolic link to /tmp/sda1, so this does not clash with the "mounted" notice earlier. On that line under Name, enter what you want to name the share representing the entire drive. Don't deal with multiple shares until you get everything working with one giant share only. Check Public (for now) and do Save and Apply.
I believe at this stage you should see your share on your network at the IP address of your router, assuming you are not connected to a different subnet. Also you should be able to map a letter like S: to the share.
I have individual users set up on mine: uncheck Public, do Apply, and use Add User to create a user, check the share name, check Samba, enter Username and Password, and do Save and Apply. _________________ 2x Netgear XR500 and 3x Linksys WRT1900ACSv2 on 53544: VLANs, VAPs, NAS, station mode, OpenVPN client (AirVPN), wireguard server (AirVPN port forward) and clients (AzireVPN, AirVPN, private), 3 DNSCrypt providers via VPN.
And you do NOT need SMB 1.0 unless your drive is so old that it supports nothing newer. I had to add SMB 1.0 support in Windows temporarily once to retrieve data from an old drive, but that's the only time I've needed it. I don't believe Windows 10 will let you keep SMB 1.0 support permanently. When you add that support, Windows will remove it after some modest number of days pass without it actually being used. But again, unless your drive is many, many years old, you should not need it. dd-wrt will work with SMB versions 1.0 or 2.0. (It does not do 3.0.)
Let me check my settings to see what I have working for USB-drive sharing. (I'm not going back and going through the setup steps, so a certain amount here is from memory.) Note that the Apply steps are not optional. You can't fill in everything and use Apply just once. On the USB page, I have
Core USB Support: Enabled
USB Printer Support: Disabled
USB Storage Support: Enabled
USB Over IP: Disabled
Automatic Drive Mount: Enabled
Use SES Button to remove drives: Enabled
Set those things first, plug in your drive - on my WRT1900ACSv2 I use the one USB 3.0 port, labeled USB 2 - and only then do Save and Apply. After the Apply, wait for many seconds, maybe a minute even, until /dev/sda1 mounted to /tmp/mnt/sda1 appears at the bottom of the screen. You may have to navigate away from the page and back. (Ignore the earlier line /dev/sda not mounted Unsupported Filesystem.) Until you get that mount confirmation, there is no reason to proceed. You can also enter the CLI and type df to get a list of mounted drives and the space used/available on each. If the mount succeeds, you should see a line for /dev/sda1 at the end. "Automatic Drive Mount" checked above will cause this mount process to happen whenever the router boots up.
Note that once the drive is mounted, ideally you should unmount the drive before unplugging the drive or powering down the router. You can do this with umount /dev/sda1 in the CLI (confirm with df) or by holding down the SES button on the router (on a WRT1900ACSv2 it's blue and in the back on the opposite side from the power switch) until the router's power light blinks off and then on. Some say that after this you should wait another 30 sec before powering down. I suppose that's to keep power to the drive long enough for it to finish writing things from buffers to the drive proper. If the drive has activity lights, watch them.
Once the drive is mounted, go to the NAS page. There the Drive Manager should show lines for /dev/sda and /dev/sda1. The latter is the important one. It should show NTFS if the drive is formatted that way. Choose it in the menu if necessary. (Obviously stay clear of the format button unless you want to effectively erase the drive contents.) Below that, enable the Samba Server and hit Apply. Then under File Sharing you need a line for /mnt/sda1. Use Add Share and the menu drop down. Note that /mnt is a symbolic link to /tmp/sda1, so this does not clash with the "mounted" notice earlier. On that line under Name, enter what you want to name the share representing the entire drive. Don't deal with multiple shares until you get everything working with one giant share only. Check Public (for now) and do Save and Apply.
I believe at this stage you should see your share on your network at the IP address of your router, assuming you are not connected to a different subnet. Also you should be able to map a letter like S: to the share.
I have individual users set up on mine: uncheck Public, do Apply, and use Add User to create a user, check the share name, check Samba, enter Username and Password, and do Save and Apply.
I have now progressed according to your instructions. I pressed the blue button and then restarted the router and the lights blinked.
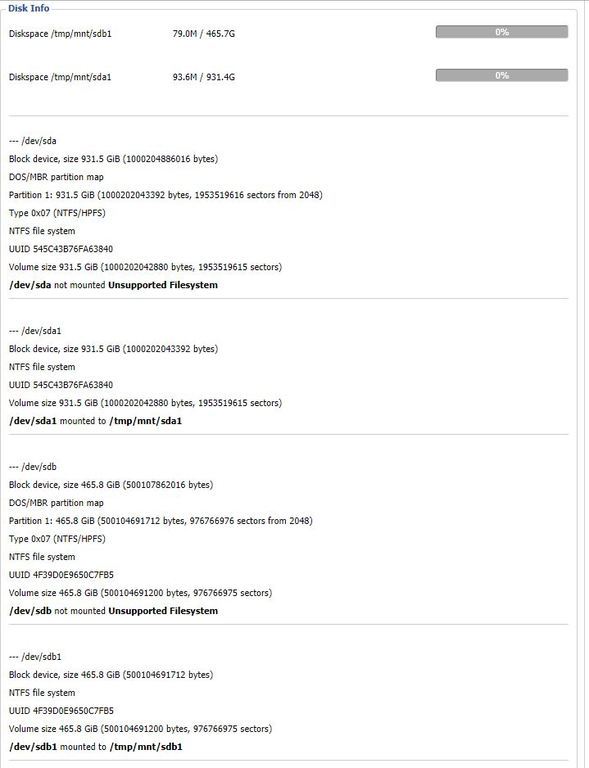
However, I now see hard drives like this so not everything is fine. What could I do?
You said you were here in Finland and you said that you think Finland is a wonderful country. It's so nice to hear that you liked my country while you work here!
Joined: 04 Aug 2018 Posts: 1447 Location: Appalachian mountains, USA
Posted: Thu Jul 25, 2019 16:19 Post subject:
You posted the same screen twice? They look identical to me. And I see no problem there. It just seems that you have two partitions (both quite large) on that drive. Take a look at what is in the first and third blocks, the ones ending with mount lines /dev/sda1 mounted to /tmp/mnt/sda1 and /dev/sdb1 mounted to /tmp/mnt/sdb1
So perhaps you should proceed for now just as I suggested so that you can see, at first, whether you can set up one of those two partitions, either sda1 or sdb1, as a share and access it from windows. In the end, of course, you should be able to have both of them set up as shares, but starting with the least complex setup is always a good first step. When it works, go back and add things like users and/or a second share, one at a time. _________________ 2x Netgear XR500 and 3x Linksys WRT1900ACSv2 on 53544: VLANs, VAPs, NAS, station mode, OpenVPN client (AirVPN), wireguard server (AirVPN port forward) and clients (AzireVPN, AirVPN, private), 3 DNSCrypt providers via VPN.
You posted the same screen twice? They look identical to me. And I see no problem there. It just seems that you have two partitions (both quite large) on that drive. Take a look at what is in the first and third blocks, the ones ending with mount lines /dev/sda1 mounted to /tmp/mnt/sda1 and /dev/sdb1 mounted to /tmp/mnt/sdb1
So perhaps you should proceed for now just as I suggested so that you can see, at first, whether you can set up one of those two partitions, either sda1 or sdb1, as a share and access it from windows. In the end, of course, you should be able to have both of them set up as shares, but starting with the least complex setup is always a good first step. When it works, go back and add things like users and/or a second share, one at a time.
The hard drive I added does not stay in file sharing but disappears when I press save and apply settings
This has been a problem from the beginning. I don't know if I should try another dd-wrt firmware? What do you think?
This is a bit frustrating I have done according to your instructions.
Joined: 04 Aug 2018 Posts: 1447 Location: Appalachian mountains, USA
Posted: Thu Jul 25, 2019 20:56 Post subject:
No, don't give up yet.
1. Do the drive names in your NAS Drive Manager match those shown as mounted in the USB page disk info? (Below I'm assuming those end in sda1 and sdb1.)
2. Does the Drive Manager show sda1 and sdb1 as NTFS?
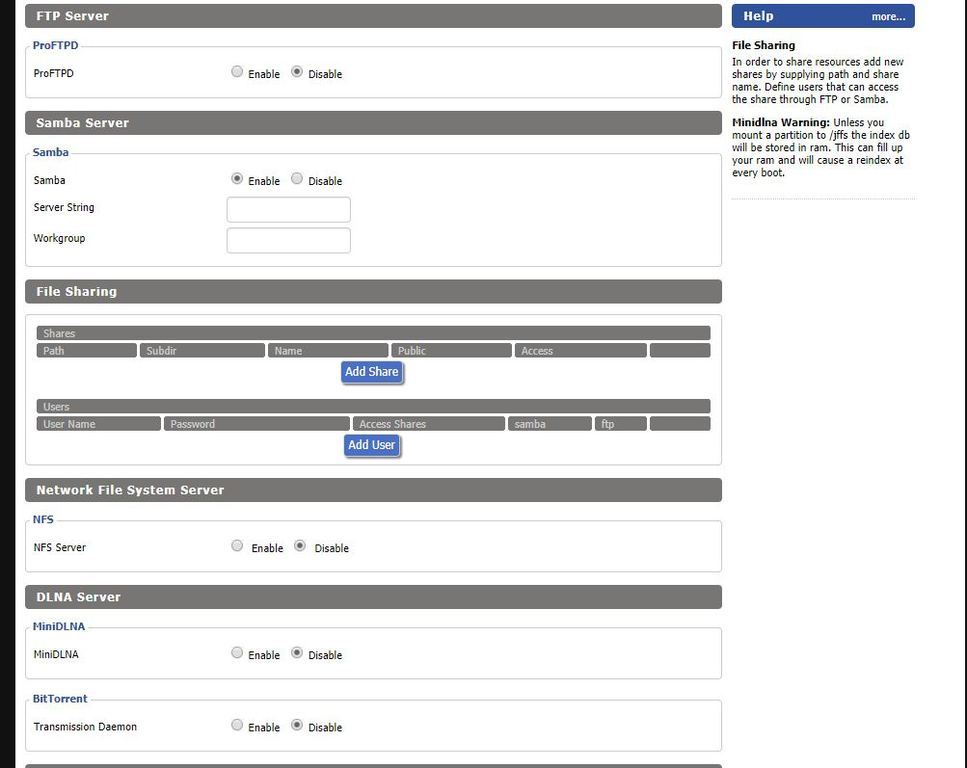
3. Samba section, Server String and Workgroup are, for now, blank, right?
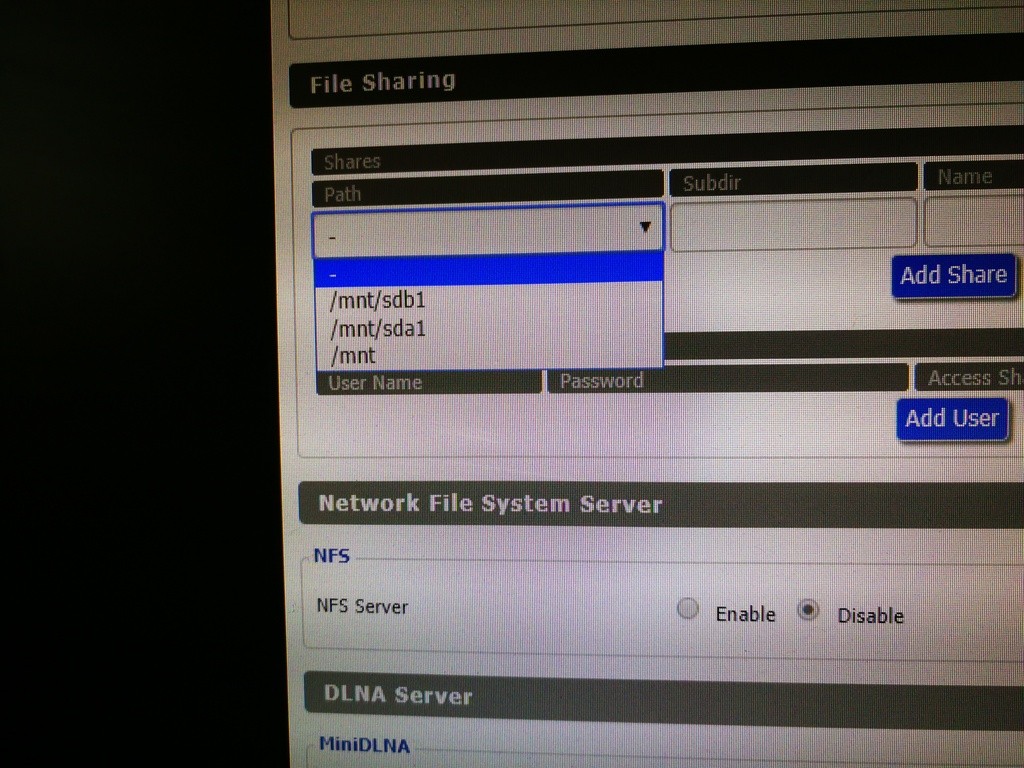
4. In the File Sharing section, the drive names match the mounted ones (also listed in the Drive Manager as NTFS drives), right? Your last picture of this section showed very different names, so check this carefully. It's fine if it begins with /mnt in one place and /tmp/mnt in another, as these are tied together with a symbolic link, what Windows I think calls an alias, but the sda1 or sdb1 must match. For the first trial, just share one of those, not both. Maximum simplicity.
5. File Sharing section: subdir field blank, right? Name field containing something you want as a share name. I don't know the NTFS limitations, so I'd suggest using only unaccented letters in the share names, at least at first.
If you don't detect the problem yet, please post the USB disk-info section and the NAS Drive Manager, Samba Server, and File Sharing sections one more time.
Do you have more than one subnet, or is everything on 192.168.1.X? You will only see the shares on the primary subnet, the one you established in Basic Setup. If you have a guest network, for example on, on 192.168.2.X, you won't see the shares there.
Are you using the reboot command in the CLI or the Reboot Router button in GUI Administration>Management to reboot? You don't want to be just power cycling without unmounting the drive first. If you have done so, you might want to unmount and remove the drive and chkdsk it on a Windows system before continuing, in case filesystem damage is why you are having issues. _________________ 2x Netgear XR500 and 3x Linksys WRT1900ACSv2 on 53544: VLANs, VAPs, NAS, station mode, OpenVPN client (AirVPN), wireguard server (AirVPN port forward) and clients (AzireVPN, AirVPN, private), 3 DNSCrypt providers via VPN.
Joined: 04 Aug 2018 Posts: 1447 Location: Appalachian mountains, USA
Posted: Thu Jul 25, 2019 21:13 Post subject:
Of note: https://forum.dd-wrt.com/phpBB2/viewtopic.php?t=320622. That post is about a very different dd-wrt release than yours, but it's still something to keep in the back of your mind. It looks like the right Apply at the right time helped.
If my last, longer post doesn't get you there, I'll post the actual notes I wrote when I first got an NTFS drive online in dd-wrt. If following those exactly as written doesn't work for you, it might be time (since we have the same model router) to try my dd-wrt release (39144), which is just a little older (March) than the one you are using.
It's important when facing a debugging challenge not to get hurried or so frustrated that you try too many things too quickly without thinking carefully and even taking notes. Success does not come by working faster but by working better. (I used to teach, so I can't help it. )
I've also had many dd-wrt projects that took awhile to get right. It's never a surprise. _________________ 2x Netgear XR500 and 3x Linksys WRT1900ACSv2 on 53544: VLANs, VAPs, NAS, station mode, OpenVPN client (AirVPN), wireguard server (AirVPN port forward) and clients (AzireVPN, AirVPN, private), 3 DNSCrypt providers via VPN.
It is easier for me to tell the views in pictures because I have a poor command of English. Here are photos of everything you asked.
I'm just frustrated because youtube video did this very easily but I'm having a lot of problems I hope so much that this will start working for me in .
Thanks for helping me maybe we can fix this problem for me by some means
The indented notes were for Windows 7, but I later used them to set up a system for Windows 10 with no difficulty. The original instructions suggested using an NTFS drive, which I did. My notes in reaction to trying each instruction are not indented.
instructions wrote:
under "File Sharing > Shares" click Add Share - select the "Path" (likely /mnt/sda1)
Yep, that was a menu item. In the CLI I see /mnt is a symbolic link to /tmp/mnt.
instructions wrote:
give your USB device a "Name"
The video says do Apply then select Access, and indeed, the Apply was required to populate the Access menu.
instructions wrote:
under "File Sharing > Users" click Add User - enter a "User Name", "Password", and select the name of the device you added above under "Access Shares" and then "samba" - click Apply Settings
Did it using the login credentials from my Windows 10 machine. Applied and Saved (in that order).
Now we get into notes I wrote for a family member:
my own notes wrote:
Open Windows Explorer and go to Network, where you should now see a "dd-wrt" entry. When you click it, you will be prompted to enter the User Name and Password you created in Services > NAS above. Click OK and you should have access to your USB storage device. You could either map this as a network drive (right-click and select "Map network drive"), or add it to your Favorites (right-click Favorites at the top of the Windows Explorer tree and select "Add current location to Favorites").
On Windows 10, in File Explorer go to This PC and click Map Network Drive in the big Computer tab's menu bar across the top. In the drop-down menu select "Map network drive." Choose a drive letter to map to in the drop-down Drive menu, perhaps "R:" for "router". In the Folder box enter \\192.168.1.1\ShareName
There are two checkboxes further down on the form. The first, "Reconnect at sign-in," I recommend it, but it is not required. Checking it will save you the hassle of doing this form again later. If your login credentials entered in the GUI are different from your Windows login credentials, check the second box, "Connect using different credentials." Then click Finish at the bottom. If you checked the different-credentials box, you'll now have to enter credentials that match what you have in the Router GUI. Check "Remember my credentials" to simplify your life in the future. Click OK.
If everything has gone well, you'll have a new drive in your file menus, and you can use it no matter which wifi network you are on. The importance of requiring login credentials is that even guests and their malware would be able to access it if it were marked public.
See if that helps. Note carefully when Apply steps are done and try to do the same. And be very careful that device names like sda1 and sdb1 match exactly. On the first try, use one or the other, either sda1 or sdb1, but don't try to create shares on both. If sda1 fails, change everything to sdb1 and try again, in case there is a problem with sda1. Really at this point we are trying to just be very thorough and straightforward and to skip nothing.
Also, you should confirm that the drive works fine when plugged directly into your Windows machine. Running chkdsk on it (easy to google) to be sure the filesystem is not damaged may be a good idea.
If this does not get us there, we may be at the point where we'll want to try one of the dd-wrt releases on which I have used exactly this USB/NAS approach. I have set up USB/NAS from the beginning this way in 36698 (not recommended, for other reasons), in 38159, and in 39144, which I use now. _________________ 2x Netgear XR500 and 3x Linksys WRT1900ACSv2 on 53544: VLANs, VAPs, NAS, station mode, OpenVPN client (AirVPN), wireguard server (AirVPN port forward) and clients (AzireVPN, AirVPN, private), 3 DNSCrypt providers via VPN.
The indented notes were for Windows 7, but I later used them to set up a system for Windows 10 with no difficulty. The original instructions suggested using an NTFS drive, which I did. My notes in reaction to trying each instruction are not indented.
instructions wrote:
under "File Sharing > Shares" click Add Share - select the "Path" (likely /mnt/sda1)
Yep, that was a menu item. In the CLI I see /mnt is a symbolic link to /tmp/mnt.
instructions wrote:
give your USB device a "Name"
The video says do Apply then select Access, and indeed, the Apply was required to populate the Access menu.
instructions wrote:
under "File Sharing > Users" click Add User - enter a "User Name", "Password", and select the name of the device you added above under "Access Shares" and then "samba" - click Apply Settings
Did it using the login credentials from my Windows 10 machine. Applied and Saved (in that order).
Now we get into notes I wrote for a family member:
my own notes wrote:
Open Windows Explorer and go to Network, where you should now see a "dd-wrt" entry. When you click it, you will be prompted to enter the User Name and Password you created in Services > NAS above. Click OK and you should have access to your USB storage device. You could either map this as a network drive (right-click and select "Map network drive"), or add it to your Favorites (right-click Favorites at the top of the Windows Explorer tree and select "Add current location to Favorites").
On Windows 10, in File Explorer go to This PC and click Map Network Drive in the big Computer tab's menu bar across the top. In the drop-down menu select "Map network drive." Choose a drive letter to map to in the drop-down Drive menu, perhaps "R:" for "router". In the Folder box enter \\192.168.1.1\ShareName
There are two checkboxes further down on the form. The first, "Reconnect at sign-in," I recommend it, but it is not required. Checking it will save you the hassle of doing this form again later. If your login credentials entered in the GUI are different from your Windows login credentials, check the second box, "Connect using different credentials." Then click Finish at the bottom. If you checked the different-credentials box, you'll now have to enter credentials that match what you have in the Router GUI. Check "Remember my credentials" to simplify your life in the future. Click OK.
If everything has gone well, you'll have a new drive in your file menus, and you can use it no matter which wifi network you are on. The importance of requiring login credentials is that even guests and their malware would be able to access it if it were marked public.
See if that helps. Note carefully when Apply steps are done and try to do the same. And be very careful that device names like sda1 and sdb1 match exactly. On the first try, use one or the other, either sda1 or sdb1, but don't try to create shares on both. If sda1 fails, change everything to sdb1 and try again, in case there is a problem with sda1. Really at this point we are trying to just be very thorough and straightforward and to skip nothing.
Also, you should confirm that the drive works fine when plugged directly into your Windows machine. Running chkdsk on it (easy to google) to be sure the filesystem is not damaged may be a good idea.
If this does not get us there, we may be at the point where we'll want to try one of the dd-wrt releases on which I have used exactly this USB/NAS approach. I have set up USB/NAS from the beginning this way in 36698 (not recommended, for other reasons), in 38159, and in 39144, which I use now.
Can't do not working despite these instructions
Completely the same problems just continue
Should we try some other dd-wrt firmware?
If I enable Backup from my settings then can I install this on an older version of Backup that we will install for me next?
Joined: 04 Aug 2018 Posts: 1447 Location: Appalachian mountains, USA
Posted: Fri Jul 26, 2019 14:41 Post subject:
Some people have had weird NAS trouble with some of the newer releases. A post today (Fri Jul 26, 2019) by ed2019 in thread https://forum.dd-wrt.com/phpBB2/viewtopic.php?p=1171218, for example, describes weird interaction between wifi and the NAS system in a WRT32X running 40400. You might want to try to complete the NAS setup with wifi off just to see if it will work. If it does, then you know for sure that you need an older dd-wrt release.
One other approach is to record all your dd-wrt settings (I use nvram show from the CLI), erase the nvram (30 second push of the recessed red button in back by the power cord or, I believe but have not tried it, nvram erase in the CLI followed by reboot). This should leave you with the same dd-wrt release but with all settings back to default. Then you can set the router password then proceed directly to the USB/NAS setup, ideally while connected to the router over ethernet. If it fails even on this reinitialized system, a bad release seems clearly indicated. If it succeeds, you can start loading your configuration back in, step by step, checking carefully to see which setting causes problems with the NAS functionality.
I'm not fond of the idea of the last paragraph though. It would be a tremendous amount of work if you already have a complex setup. Instead I'd check to see what partition dd-wrt is loaded into. In the CLI (ssh or telnet or putty) do ubootenv get boot_part and look at the last line of its few lines of output. Partition 1 is a little larger than partition 2, and recent dd-wrt builds have not quite fit in partition 2 of the WRT1900ACSv2. Usually attempts to update into the smaller partition cause obvious failure, with the router just booting back into the old firmware. But you might want to be sure your dd-wrt firmware is in partition 1. If it is not, you can load dd-wrt into partition 1 either by "updating" dd-wrt to the same version, from the GUI using the webflash file, or by "updating" instead to an older release.
If you decide to try an older release, I suggest trying the one I am using, 39144 (from March) from the ftp site ftp://ftp.dd-wrt.com/betas/, of course using the webflash file for the WRT1900ACSv2 specifically. Unless you are trying to set up DNS over TLS (guide at https://forum.dd-wrt.com/phpBB2/viewtopic.php?p=1166512), you won't really be giving up anything by going back that far. (And this earlier release actually makes using DNSCrypt much easier than the new releases do.) Most important though is that 39144 works for my NAS setup on a WRT1900ACSv2. Further, my experience with it is that 39144 will work fine in either partition.
But if you are going to use a newer release, do be sure it is in the larger partition, just in case. The usual webflash procedure to update from the GUI always loads the new firmware into the opposite partition. To load it instead into the currently used partition (as determined by ubootenv above), see the section entitled Trick to Upgrade DD-WRT Firmware without losing current configuration or the need to return to Stock Firmware in the Cliff Notes at https://forum.dd-wrt.com/phpBB2/viewtopic.php?t=311117. (The Cliff Notes also discuss how to use telnet from Windows, in case this is something you have not done before.) _________________ 2x Netgear XR500 and 3x Linksys WRT1900ACSv2 on 53544: VLANs, VAPs, NAS, station mode, OpenVPN client (AirVPN), wireguard server (AirVPN port forward) and clients (AzireVPN, AirVPN, private), 3 DNSCrypt providers via VPN.
Joined: 04 Aug 2018 Posts: 1447 Location: Appalachian mountains, USA
Posted: Fri Jul 26, 2019 15:23 Post subject:
One note in addition to the above. BEFORE you do anything drastic like flashing a different dd-wrt release, please do try setting up NAS using a simple share name with nonaccented characters. No umlauts. Just in case. It would be unfair if this were required, but fairness is never guaranteed in life, is it? _________________ 2x Netgear XR500 and 3x Linksys WRT1900ACSv2 on 53544: VLANs, VAPs, NAS, station mode, OpenVPN client (AirVPN), wireguard server (AirVPN port forward) and clients (AzireVPN, AirVPN, private), 3 DNSCrypt providers via VPN.
One note in addition to the above. BEFORE you do anything drastic like flashing a different dd-wrt release, please do try setting up NAS using a simple share name with nonaccented characters. No umlauts. Just in case. It would be unfair if this were required, but fairness is never guaranteed in life, is it?
I don't know if it would be best for me to forget the dd-wrt nas server.
A friend of mine will bring me 8 hard drives next week and I have a plan to make a FreeNAS server for myself. I already have one commercial NAS server and it has worked very well.
But I have three computers with dual processor motherboards. I use one of these computer FreeNAS servers in my project.
Some people have had weird NAS trouble with some of the newer releases. A post today (Fri Jul 26, 2019) by ed2019 in thread https://forum.dd-wrt.com/phpBB2/viewtopic.php?p=1171218, for example, describes weird interaction between wifi and the NAS system in a WRT32X running 40400. You might want to try to complete the NAS setup with wifi off just to see if it will work. If it does, then you know for sure that you need an older dd-wrt release.
One other approach is to record all your dd-wrt settings (I use nvram show from the CLI), erase the nvram (30 second push of the recessed red button in back by the power cord or, I believe but have not tried it, nvram erase in the CLI followed by reboot). This should leave you with the same dd-wrt release but with all settings back to default. Then you can set the router password then proceed directly to the USB/NAS setup, ideally while connected to the router over ethernet. If it fails even on this reinitialized system, a bad release seems clearly indicated. If it succeeds, you can start loading your configuration back in, step by step, checking carefully to see which setting causes problems with the NAS functionality.
I'm not fond of the idea of the last paragraph though. It would be a tremendous amount of work if you already have a complex setup. Instead I'd check to see what partition dd-wrt is loaded into. In the CLI (ssh or telnet or putty) do ubootenv get boot_part and look at the last line of its few lines of output. Partition 1 is a little larger than partition 2, and recent dd-wrt builds have not quite fit in partition 2 of the WRT1900ACSv2. Usually attempts to update into the smaller partition cause obvious failure, with the router just booting back into the old firmware. But you might want to be sure your dd-wrt firmware is in partition 1. If it is not, you can load dd-wrt into partition 1 either by "updating" dd-wrt to the same version, from the GUI using the webflash file, or by "updating" instead to an older release.
If you decide to try an older release, I suggest trying the one I am using, 39144 (from March) from the ftp site ftp://ftp.dd-wrt.com/betas/, of course using the webflash file for the WRT1900ACSv2 specifically. Unless you are trying to set up DNS over TLS (guide at https://forum.dd-wrt.com/phpBB2/viewtopic.php?p=1166512), you won't really be giving up anything by going back that far. (And this earlier release actually makes using DNSCrypt much easier than the new releases do.) Most important though is that 39144 works for my NAS setup on a WRT1900ACSv2. Further, my experience with it is that 39144 will work fine in either partition.
But if you are going to use a newer release, do be sure it is in the larger partition, just in case. The usual webflash procedure to update from the GUI always loads the new firmware into the opposite partition. To load it instead into the currently used partition (as determined by ubootenv above), see the section entitled Trick to Upgrade DD-WRT Firmware without losing current configuration or the need to return to Stock Firmware in the Cliff Notes at https://forum.dd-wrt.com/phpBB2/viewtopic.php?t=311117. (The Cliff Notes also discuss how to use telnet from Windows, in case this is something you have not done before.)
I have just a one-time reset all the settings, and I do not want to do it again any more.
It takes quite a while for me to configure my router because there are so many settings in use for me.
I also have to install my own Wifi printer again if I reset my router.
I think we should try the older dd-wrt release.
I would like to install this external usb hard drive because I want to use the hard drives in it. Even though I make a FreeNAS server, I still want this DD-wrt nas to be used as well. However, I need a lot of space so I need this too.
You can also try using a different USB enclosure...
About a year and a half ago there was a change to the USB driver. The drive/enclosure which I had been using as a NAS drive (2.5inch drive in Rosewill enclosure) stopped working with the updated DD-WRT. I confirmed it was the DD version. I changed my enclosure to a 3.5 inch drive/enclosure with it's own power supply and the NAS worked again. If you happen to be using a drive enclosure that does not have it's own power supply you could try a different drive/enclosure.
On the latest versions of DD I also made sure to set my UUID for the drive and to repoint all mount points and shares to "jffs". That was only required for me starting with r40400. _________________ WRT1900ACSv2